5 Easy Halloween Nail Art Ideas
Since Halloween is nearly upon us, I thought I'd show you guys some ideas for cool but relatively easy nail art looks so if you don't feel like dressing up but want to embrace a little bit of the festive spirit, then maybe give these a go, come on under the cut and I give step-by-step instructions on how to achieve these looks!
I originally had sort of tutorial videos for these but they kind of went tits up (combination of lack of tripod and varying lighting conditions does not make for a great video) but hopefully a brief textual explanation will be enough, since they are all pretty straightforward.
I originally had sort of tutorial videos for these but they kind of went tits up (combination of lack of tripod and varying lighting conditions does not make for a great video) but hopefully a brief textual explanation will be enough, since they are all pretty straightforward.
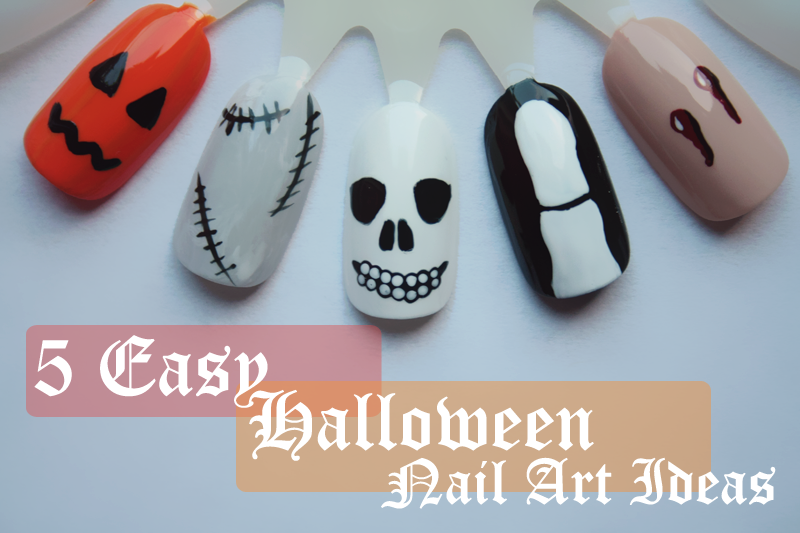
1. The Pumpkin - Paint your nails orange (Barry M Mango) and once dry, paint slightly curved lines down the nail in a slightly lighter polish using a striper brush. Once these are dry, paint two black triangles for eyes and thick zigzagged line for the mouth and seal with top coat once dry.
2. The Monochrome Frankenstein - Paint your nails grey (Rimmel London Little Bo Peep) and once dry, add light splodges of white polish onto the nail in random areas, while still wet, apply acetone over the splodges to give a mottled effect. Once dry, use a striper brush and apply black stitching detail. Seal with top coat when dry.
3. The Skull - Paint your nails white and once dry, using a detailing brush, paint two black rounded triangles for eyes, two halves of a heart in black as the nose and a curved line for the mouth. Using the larger end of a dotting tool, place black dots above and below the curved line. Once dry, use a smaller dotting tool and apply white on top of the black dots, creating the teeth. Don't press down too hard or the black will show through, a lighter touch is better. Once dry, seal with top coat.
4. The Finger - Paint your nails black and once dry, use a detailing brush and outline the shape of the top of the finger bones with white polish, ensuring you keep a gap between the top two. Fill in the outline and once dry, seal with top coat. Use a reference for this one if you're unsure of the shapes, just use google images :-)
5. The Vampire Bite - Paint your nails a nude shade (Barry M Lychee) and once dry, using a dotting tool, apply a dot of dark red polish to the nail and lift the dotting tool slightly off the nail and dry the polish down, creating a dripping effect. Repeat this again at a slightly higher or lower angle to give the impression of an angled bite. Once dry, use white polish to add highlight and black to give lowlight, this gives the design a little bit of dimension and realism. If you use a matte red like Barry M Crush and bypass the last top coat, it gives the effect of real dried blood.
I hope this has been a little bit of help and apologies for not having the video tutorials but I thought they looked too shoddy but anyway, there's still more Halloween stuff to share with you guys so I hope I shall see you then, until next time!


These are so nice!
ReplyDeletehttp://shopaholicoverhere.blogspot.nl/